Deliver to UAE
IFor best experience Get the App


Avery Clear Laminating Sheets, 9" x 12", Permanent Self-Adhesive, 50 Self-Laminating Sheets, Great for Protecting Documents, Photos, and Signs More (73601)
Product ID: 1144918
Secure Transaction
Details
- BrandAvery
- ColorClear
- Sheet Size9-x-12-inch
- Item Weight1.4 Pounds
- ManufacturerAvery
📏Precise gridlines for perfect cuts
♻️Eco-friendly PVC-free material
🛡️Acid-free, archival-safe protection
Frequently Bought Together


Description
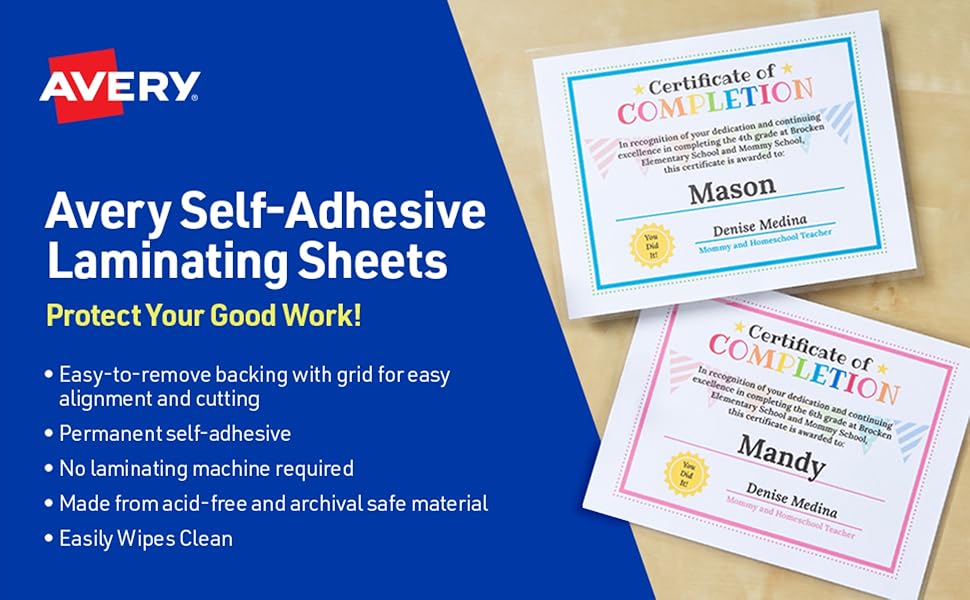
🛡️ Protect your legacy with a glossy, green edge!
- ECO CONSCIOUS SLEEK - PVC-free, glossy finish keeps your documents protected and planet-friendly.
- LONG LASTING DOCUMENT ARMOR - Acid-free, archival-safe lamination guards against fading and wear.
- PRECISION PERFECT EVERY TIME - Built-in gridlines ensure flawless alignment and trimming.
- VERSATILE REUSABLE SURFACE - Write, wipe, and reuse with dry erase marker compatibility.
- EFFORTLESS PROFESSIONAL FINISH - Self-adhesive sheets seal instantly—no machine, no fuss.
Avery Clear Laminating Sheets (9" x 12") offer 50 permanent, self-adhesive sheets that deliver professional-quality lamination without a machine. Featuring precise gridlines for easy sizing, acid-free archival-safe material for long-term protection, and an eco-friendly PVC-free design, these sheets are perfect for preserving documents, photos, signs, and more. Bonus: they double as dry erase surfaces for reusable notes and lists.


Specifications
| Manufacturer | Avery |
| Brand | Avery |
| Item Weight | 1.4 pounds |
| Product Dimensions | 12.25 x 9.25 x 0.5 inches |
| Item model number | 73601 |
| Is Discontinued By Manufacturer | No |
| Color | Clear |
| Cover Material | Poly |
| Material Type | Plastic |
| Number of Drawers | 2 |
| Number of Items | 1 |
| Size | 9" x 12" |
| Sheet Size | 9-x-12-inch |
| Ink Color | Clear |
| Manufacturer Part Number | 73601 |
Have a Question? See What Others Asked
Is this a pack of 50 sets to cover 50 papers front and back, or is it 50 individual sheets that will cover 25 papers front and back?
Are these glossy or matte finished? I need something that is non-glare.
Does anyone know if you can use a dry erase marker on these? Does it stay. Does it come off later?
Can you place two sheets of paper, back-to-back, to laminate together?
Common Questions
Yes, all products are sourced directly from authorized retailers in the US, UK, UAE and India. We maintain strict quality control processes and verify each product before shipping. All items come with applicable manufacturer warranties and are covered by our standard return policy.
Delivery times vary by destination country, typically ranging from 3-9 business days. Each order is fully trackable through our system. We handle all customs clearance and use reliable courier partners for last-mile delivery. You'll receive regular updates about your order status via email and our app.
Desertcart is an international e-commerce platform operating since 2014. We securely process thousands of orders globally each day. Every product goes through our quality verification process before delivery, and we provide end-to-end order tracking, 24/7 customer support, and a comprehensive returns policy to ensure a safe shopping experience.
Our prices include the product cost, international shipping, import duties, customs clearance, and local delivery charges. We handle all customs and import procedures, ensuring there are no hidden fees upon delivery. PRO members receive additional benefits including free shipping.
Trustpilot
TrustScore 4.5 | 7,300+ reviews
The MOLLE sheath is of exceptional quality. Very happy with my purchase.
2 weeks ago
Fast shipping and excellent packaging. The Leatherman tool feels very premium and sturdy.
1 day ago
Shop Global, Save with Desertcart
Value for Money
Competitive prices on a vast range of products
Shop Globally
Serving millions of shoppers across more than 100 countries
Enhanced Protection
Trusted payment options loved by worldwide shoppers
Customer Assurance
Trusted payment options loved by worldwide shoppers.
Desertcart App
Shop on the go, anytime, anywhere.